
Keeping your body in good health is a difficult task. No one can be in good health for long if he/she does not monitor the core vital signs of good health. Eating healthy and exercising are not the only essentials to maintaining good health but, monitoring vitals using a health monitoring device regularly is also essential.
Health monitoring
It is the use of IT and telecommunications to monitor the health of patients in their homes and to help ensure that appropriate action is taken. Patients are provided devices that measure vital signs, such as blood pressure, glucose level, pulse, blood oxygen level and weight, and then transmit the data to clinicians. Other devices are used for messaging — gathering information from patients on their symptoms, cognitive state, and behavior, and sending them information and advice.,(1)
Key Benefits of Regular Health Monitoring
Health monitoring is very important in terms of prevention, particularly if the early detection of diseases can reduce suffering and medical costs. Diagnosis and prompt treatment of various diseases can radically improve alternatives for the patient’s medical treatment. This is particularly true in cardiovascular diseases and diabetes; the use of sensors can identify patients at risk by monitoring and transmission of vital signs to medical professionals, who may subsequently determine the actions needed to safeguard the patient’s health. (2)
While regular monitoring of one’s health is essential, it can also be very challenging if you prefer to go only to hospitals for check-ups because (3)
- There is always overcrowding in hospitals
- Lack of doctors
- Huge number of patients with complicated conditions
- Unavailability of monitoring devices
Traditionally, you needed to go to a hospital to see a doctor for health checkups, which was a time and money-consuming task. However, with the technological advent, of all this has changed significantly. Nowadays remote health monitoring is helping patients in recording their health vitals in non-clinical set-ups or on the go. Easy-to-use devices can be operated in the home with no technical knowledge to prevent multiple illnesses. Decreased cost, less hassle, improved experience, and better results are key benefits of regular home monitoring. These devices;(3)
- Reduce hospitalization related cost, time and efforts
- Reduce time needed for taking appointment
- Detect serious illness early for quick treatment
- Rapid diagnosis that helps to reach a logical conclusion
- Better adherence to prescribed medications

Health monitors devices
1-Blood sugar
Home glucose monitors can help you keep tabs on your diabetes and lower your risk of complications. Along with treatment, using a home monitor can help you identify the things that make your blood sugar increase or decrease, from exercise to illness, stress to dehydration, and more.
The Centers for Disease Control and Prevention (CDC), Trusted Source recommends checking your blood sugar as advised by your doctor. How often you should check depends on a number of things, including:(4)
- the type of diabetes you have
- what medications you’re currently taking
- how many meals you eat each day
Some doctors may recommend you test only a few times a day, while others may think continuous monitoring is more appropriate — each situation is unique and may change over time.
Below are tips for how to use a blood sugar meter:(5)
- Make sure the meter is clean and ready to use.
- After removing a test strip, immediately close the test strip container tightly. Test strips can be damaged if they are exposed to moisture.
- Wash your hands with soap and warm water. Dry well. Massage your hand to get blood into your finger. Don’t use alcohol because it dries the skin too much.
- Use a lancet to prick your finger. Squeezing from the base of the finger, gently place a small amount of blood onto the test strip. Place the strip in the meter.
- After a few seconds, the reading will appear. Track and record your results. Add notes about anything that might have made the reading out of your target range, such as food, activity, etc.
- Properly dispose the lancet and strip in a trash container.
- Do not share blood sugar monitoring equipment, such as lancets, with anyone, even other family members. For more safety information.
- Store test strips in the container provided. Do not expose them to moisture, extreme heat, or cold temperatures.
Makkah Pharmacy recommends:
2-Blood pressure
Blood pressure monitoring means taking your blood pressure on a regular or continuous basis. Blood pressure monitoring helps assess your overall health and your condition when you are sick or injured. Blood pressure monitoring can occur at a doctor’s appointment, at home on a regular basis, and in the hospital continuously if you are seriously ill or injured. (6)
Blood pressure is the force exerted on the walls of your arteries as your heart pumps blood through your body. Your blood pressure consists of two numbers followed by the units of pressure, such as 120/80 mmHg (millimeters of mercury): (6)
- The top number is the systolic pressure—the highest pressure in your arteries as the heart is pumping blood.
- The bottom number is the diastolic pressure—the lowest pressure in your arteries when the heart is at rest between beats.
What is the correct way to measure blood pressure?(7)
Learn the correct way to have your blood pressure taken, whether you’re getting it checked at the doctor’s office or checking it yourself at home. Use this checklist:
- Don’t eat or drink anything 30 minutes before you take your blood pressure.
- Empty your bladder before your reading.
- Sit in a comfortable chair with your back supported for at least 5 minutes before your reading.
- Put both feet flat on the ground and keep your legs uncrossed.
- Rest your arm with the cuff on a table at chest height.
- Make sure the blood pressure cuff is snug but not too tight. The cuff should be against your bare skin, not over clothing.
- Do not talk while your blood pressure is being measured.
How to measure your blood pressure at home using a home monitor?(8)
- Follow the instructions that came with your monitor. Make sure you place the cuff around your arm as described in the instructions.
- Place the arm cuff just above your elbow. The cuff should be about 2cm above your elbow to make sure it can detect the artery in your arm, just under the skin.
- Keep still and quiet while you take your reading. Moving, chewing, talking and laughing can affect your reading. Make sure you don’t cross your legs, as this will raise your reading too.
- Take two or three readings, each about one to two minutes apart. If your first reading is much higher than the next, ignore it and take an extra reading. Once you have two to three readings, you can work out the average.
- Keep a record of your measurements. Record all your readings in the memory of your monitor, on your computer or phone or on paper – whichever you prefer. Write them down exactly as they appear on screen.
Makkah Pharmacy recommends:
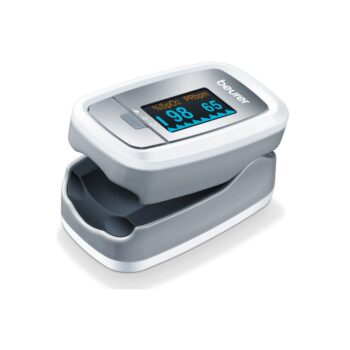
3-Pulse oximeter
Pulse oximetry is a noninvasive test that measures the oxygen saturation level of your blood.
It can rapidly detect even small changes in oxygen levels. These levels show how efficiently blood is carrying oxygen to the extremities furthest from your heart, including your arms and legs.(9)
The pulse oximeter is a small, clip-like device. It attaches to a body part, most commonly to a finger.
Medical professionals may use pulse oximeters to monitor the health of people with conditions that affect blood oxygen levels, especially while they’re in the hospital.(10)
These can include:
- chronic obstructive pulmonary disease (COPD)
- asthma
- pneumonia
- lung cancer
- anemia
- heart attack or heart failure
- congenital heart disease
To take a reading with a pulse oximeter, you will:(9)
- Remove any jewelry or fingernail polish on your finger if measuring from this location.
- Make sure your hand is warm, relaxed, and below heart level if attaching the device here.
- Place the device on your finger, earlobe, or toe.
- Keep the device on for as long as needed to monitor your pulse and oxygen saturation.
- Remove the device once the test is over.
Makkah Pharmacy recommends:
4- Thermometer
Checking your body’s temperature with a thermometer is an easy way to see if a fever is present. A fever, which is a rise in the body’s temperature, is usually caused by an infection. Though fevers can be uncomfortable, they are a sign that the body is fighting off infection.
What is a normal body temperature?
Normal body temperature is about 98.6 degrees Fahrenheit (°F) or 37 degrees Celsius (°C). Normal temperature often varies from 1° to 2°F (½° to 1°C). A normal temperature is usually lower in the morning and increases during the day. It reaches its high in the late afternoon or evening.(11)
What temperature is considered a fever?(11)
In adults, a fever is considered to be a temperature of 100.4°F (38°C) or above. You can treat this at home with a fever reducer medication and fluids to make yourself more comfortable, or let it run its course. But if it reaches 102°F (38.8°C) or higher and home treatment doesn’t lower it, call your healthcare provider.
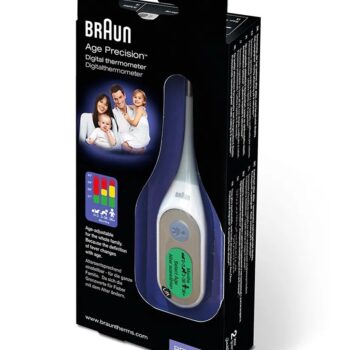
How to use a digital thermometer?(11)
A digital thermometer can be used in three different ways. These include:
- Oral: For this method, the thermometer is placed under the tongue. This method is used for adults and children 4 and over who are able to hold thermometers in mouth.
- Rectal: For this method, the thermometer is inserted gently into the rectum. This is mostly done in babies but can use in children up to 3 years of age. You can take rectal temperatures in children older than 3 years, but it might be difficult to keep them as still as they need to stay.
- Axillary: For this method, the thermometer is placed in the armpit of young children or adults whose temperature can’t safely be done orally. This method is not as accurate as oral or rectal but can be used as a quick first check. You can follow this with an oral or rectal reading.
Other types of thermometers (young children and adults):
Tympanic (ear): This type of thermometer measures the temperature inside of the ear by reading the infrared heat there. For best results, make sure to follow the instructions on the device about placing the tip correctly. For older babies and children, ear thermometers can be quicker and easier to use. However, they are not recommended if your baby is three months old or younger. They should not be used if your child has too much earwax, or if they have an earache.
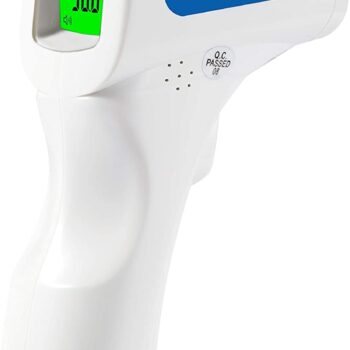
Temporal artery (forehead): Forehead thermometers are also used to measure temperature, but may not be as reliable as the digital thermometers and are usually more expensive. They are placed on the temporal artery of the forehead and measure the infrared heat that comes off of the head.
Makkah Pharmacy recommends:
Using a digital rectal thermometer (for babies and children up to 3 years old)(11)
- Wash the rectal thermometer with soap and warm water. Don’t use an oral thermometer.
- Put a small amount of lubricant (petroleum jelly or Vaseline®) on the sensor (tip) of the thermometer.
- Place your child belly down on your lap or table, with one palm on their back. Or place them face-up, with legs bent toward their chest and hold the back of their thighs with one hand. Put a diaper or cloth under your child as he or she may poop immediately after removal of the thermometer.
- Using your other hand, gently insert the thermometer into the anus until the tip is completely inside the rectum. DO NOT force it if you feel resistance.
- Keep the thermometer steady with your hand until you hear the beep (around 30 seconds).
- Gently remove. Record temperature and time.
- Clean the thermometer thoroughly with soap and water. You may want to clean it off again with alcohol and then rinse it again.
Using a digital axillary (same as oral) thermometer(11)
- Remove the child’s shirt and place the thermometer tip into your child’s armpit. Make sure your child’s armpit is dry to get the most accurate reading.
- Keep the axillary thermometer in place by folding your child’s arm across his or her chest.
- The thermometer will beep when reading is done (this method may take longer than 30 seconds).
- Remove and record temperature and time.
- Clean the thermometer with soap and water or with alcohol, always rinsing as a last step.
- You should not use your old glass thermometer that contains mercury. These types of thermometers were found in nearly every house and hospital at one time before digital thermometers were available. The mercury thermometers were difficult to read and so did not always provide accurate information.
The main reason they are no longer recommended is that mercury can poison you. This can happen when the glass breaks and mercury is released.
Makkah Pharmacy recommends:
References:
- Definition of Home Health Monitoring – Gartner Information Technology Glossary [Internet]. [cited 2022 Aug 26]. Available from: https://www.gartner.com/en/information-technology/glossary/home-health-monitoring
- Pramanik PKD, Pareek G, Nayyar A. Security and privacy in remote healthcare: Issues, solutions, and standards. Telemedicine Technologies: Big Data, Deep Learning, Robotics, Mobile and Remote Applications for Global Healthcare. 2019 Jan 1;201–25.
- Health Monitoring Devices: Why They Are Important and How They Will He [Internet]. [cited 2022 Aug 26]. Available from: https://drtrust.in/blogs/news/regular-health-monitoring-devices-why-they-are-important-and-how-they-will-help-you
- 7 Best Glucose Monitors 2022: From Affordable to Continuous [Internet]. [cited 2022 Aug 26]. Available from: https://www.healthline.com/health/diabetes/best-glucose-monitors#A-quick-look-at-the-best-home-glucose-monitors-and-meters
- Monitoring Your Blood Sugar [Internet]. [cited 2022 Aug 26]. Available from: https://www.cdc.gov/diabetes/managing/managing-blood-sugar/bloodglucosemonitoring.html
- Blood Pressure Monitoring: Why It’s Done, What to Expect [Internet]. [cited 2022 Aug 26]. Available from: https://www.healthgrades.com/right-care/high-blood-pressure/blood-pressure-monitoring
- Virani SS, Alonso A, Benjamin EJ, Bittencourt MS, Callaway CW, Carson AP, et al. Heart disease and stroke statistics—2020 update a report from the American Heart Association. Circulation. 2020;141(9):E139–596.
- Measure Your Blood Pressure | cdc.gov [Internet]. [cited 2022 Aug 26]. Available from: https://www.cdc.gov/bloodpressure/measure.htm
- Jubran A. Pulse oximetry. Crit Care. 2015 Jul 16;19(1).
- Pulse Oximetry: Uses, Readings, and How It Works [Internet]. [cited 2022 Aug 26]. Available from: https://www.healthline.com/health/pulse-oximetry#readings
- How To Use A Thermometer To Take Your Temperature [Internet]. [cited 2022 Aug 26]. Available from: https://my.clevelandclinic.org/health/articles/9959-thermometers-how-to-take-your-temperature


Write a comment
Your email address will not be published. All fields are required